Monday, December 31, 2012

MINI MILLING MACHINE

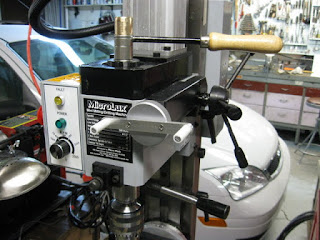
For quite a while I have had a desire for a mini milling machine. Not so much that I really needed it, but more that I just wanted it to mate with my mini lathe, and because several of my machinist friends had one. These are marketed by a number of vendors and are all basically the same with only minor differences. I selected a Micro Mark because it is white and clean looking. It arrived in late September and the first order of business was unpack it from it's two cardboard shipping cartons and clean the gooey anti rust preservative off. Then mount it next to the mini lathe on a portable workstation,
As with a machine of almost any kind it needed tooling and accessories to make it useful.
I started by making a combo wrench-hammer for the draw bolt, and putting a crank handle on the micro down feed knob.
Then I acquired a holder and set of ER collets. Also made some "T" nuts, and hold down clamps, and a couple special wrenches.
The setup coincided with the starting of an Atkinson Cycle model Gas engine and a number of the machining operations were preformed on the mini mill. Shown here it is shaping the saddles for the cylinder using a fly cutter. The metal is aluminum, but it walked right through it with beautiful smooth cuts.
                                                    
                And here it is slotting a screw head with a tiny fly cutter.

It is fun to use this little mill, and also the lathe, Like using toys that really work. I'm impressed. Within their capacity they both do a fine job. It is also nice to have a second machine available if one of my larger machines is set up for some special operation. I find that I use them much more than I anticipated I would.




Monday, September 3, 2012

TWO PUMPS

About 20 or more years I had an inspiration to build a model water well pump, and I went so far as to pour two castings. One in aluminum and one in bronze. Then I became distracted by other things and like myself the castings have been aging. So long in fact that the bronze developed a patina. A couple weeks ago I decided I better finish the job before I loose the opportunity.
It was decided to make one with a motor driven geared pump jack, and the other with a hand operated pump handle. Both types were common, and it usually depended on how affluent the owner was whether it had the motor operated pump jack, and if it did have the gear driven jack it was usually powered by a gasoline engine rather than an electric motor, but for my demonstration purposes an electric motor is much more convenient so that is what I used. Actually a small motor salvaged out of a defunct computer printer.
The aluminum casting was painted, and the bronze left natural. The advantage of a hand powered pump is that you can still get water in case of a power failure. And if only a small amount of water was needed it was easier to pump it, than fuss with starting cranky old engine.
    Both pumps work well as can be seen in the video below.
There you have it. A couple more models to put on display for "show and tell", my favorite activity.


Thursday, August 2, 2012

MINI WEED

Another model project was completed yesterday, August 1st 2012.
Inspiration to build it came from my little friend Max Francis. Last Christmas Max's grandpa Larry gave Max his childhood toy Weeden Steam engine. Out of his many grand kids, Larry said that Max was the "one" who would appreciate and take care of it. These are now real collector items and even I would like to have one. However the best option for me is just build it myself. Working from images of Max's engine, emailed me by his father Guy, I constructed about a 2/3rds size replica.
    Shown below are a couple images showing the new model next to the old original Weeden engine.
And shown below is a video of it running on compressed air. Although it is capable of being steamed, it is much quicker, easier and cleaner running them on air.
                                         Hope you enjoyed looking at it.


Max got his Weeden up to steam next to Birk's Mini Weed. They look great together.

Friday, July 13, 2012

EGG TIMER for the person who has everything


 Ten years ago there was a construction article authored by John Wilding published in the English Horological Journal on building a six minute weight driven pendulum operated egg timer. Knowing that I liked such things fellow hobby machinist, Pete Larsen shared the article with me, however it just sat dormant until a couple weeks ago. It was a fairly simple project and a pleasure to build. It is equipped with an unusual MacDowell single pin escapement that is interesting to watch. It is self starting and with pendulum bobs both above and below the pivot it acts somewhat like a balance wheel. It is easy running and requires only small weights, but they fall fast. About 40 inches in six minutes. A suitable bell could not be readily located So one was spun out of 1/16" sheet brass. That turned out to be a day long project in its self.
Now that it is finished I'm not sure how to use it. Do they have Egg Races?

Timing eggs or not, it is interesting to watch. Take a look.


Wednesday, June 20, 2012

Robinson Type Hot Air Model

Another model has just been completed and is ready to add to the display. This one is a model of a Robinson type hot air engine. It is not an exact scale model of any particular prototype, but a very close approximation.

Building it as I did, it was possible to pick and choose from various materials on hand. Construction was sort of hybrid because some parts were fabricated, machined from solid material, and some were castings.
I wanted to put lettering on the main casting, but raised letters on the side of a pattern will not lift out of the sand, so I used a method used by bell founders. The lettering was attached to a stick and after the pattern was lifted out of the mold, the stick was put down inside and gently pressed into the sand.
The results were not perfect, but satisfactory, as can be seen by the rough castings.
A couple more in process pictures. The hot cylinder was made from the end of a one pound propane tank. The displacer from a tin can. The stove was fabricated from sheet metal. There was a limited amount of head room for the burner, so I made a alcohol fired penny burner that works just beautiful as you can see in the video. The penny burner is a light weight backpacking stove for campers built out of the bottoms of a couple aluminum cans. Instructions for building one can be found on the internet
     It is an excellent running engine. I knew it would be even before firing it up, because it turned so free and easy, and yet had a little bounce from compression. Here is a short video, take a look for yourself.


Friday, May 25, 2012

Yard Queen

Yesterday a new yard queen came to our yard as shown above surveying her domain. She appears to be pleased, and lets hope it stays that way, She is mostly an assemblage of scraps and old machine parts that otherwise would be destine for the remelt furnace.

Tuesday, May 8, 2012

GOOD GUYS

A new device has just been completed that I plan to use to rid the neighborhood of "bad guys" I do not plan to shoot a shot. One look at the thing and they will either leave in a hurry, or else turn into Good Guys.
     Actually it is a one and a half size scale model of  the Civil War vintage Remington .44 Army Revolver that was introduced in 1863. Although it has functional parts, it is not intended to be a shooting gun, simply a conversation piece for people to heft and chuckle about. It weighs 12 pounds, and takes a pretty stout arm to hold it in shooting position, and even then it is difficult to reach the trigger. Caps of that size are not available, and I did not drill the nipple holes, so it would pretty difficult for someone shoot it.
      The barrel was machined out of a solid bar of #416 stainless steel. The cylinder SAE 1045 steel bar. The trigger and hammer, etc. 1/2" steel plate material. The main hammer spring from a real heavy duty power hacksaw blade. The grips were carved from black walnut. The reason for these choices is because that is what was on hand.

Building it was quite a process. First a wood pattern was made to form a sand mold, into which was poured melted brass. As you see the first mold did not fill completely, so a second mold was made and it did fill. Casting has it's little frustrating problems.


Then started the machining process, and I'll show just a couple operations. First the frame was set up in the lathe with a special fixture and the barrel hole bored and threaded.


Then to the milling machine where much of the inside space was milled out.


But the milling cutter could not reach all areas so the shaper was put into use. Shapers are obsolete by today's standards, but there are still some operations that they do very well. Space was really tight, but I made it.


Again the shaper being used to square up the trigger hole.


 A few of the parts as work was progressing.


 Not knowing where to put it I finally hung it over the fireplace in the display room. After all they use to hang the old Kentucky Long Rifles over the fireplace.

Wednesday, March 14, 2012

LITTLE ERIC NORDEVALL


In 1856 the Swedish steam ship named the Eric Nordevall sank and laid on the bottom of a lake until the 1980's when divers found it. A replica, the Eric Nordevall II has been constructed, and there is a lot of information, videos, etc, about it on the Internet if you care to look it up. The ship was a side paddle wheel design powered by two engines. This model engine designed by Mogens Kilde is not a scale model of the originals, but was inspired by the original, and has a number of similarities to the original. A construction article was published in The Home Shop Machinist in 2008. It was fun to build, and is a most interesting little machine to look at and watch in operation. Much to my surprise it took off running the first time air was applied without any adjustments or anything.

Display space is getting scarce, but I found a place to squeeze it in, it only has a foot print of about 2" x 4".

Sunday, February 19, 2012

Cranky Desk Toy


A Cranky New Desk Toy has just been added to the collection. It has a very soothing effect on "cranky" people, like me.

Sunday, February 5, 2012

Half Size Cretors Pop Corn and Peanut Eengine

About a hundred years ago Cretors Co. in Chicago built a line of vending stations from small stationary ones that might be placed in buildings, to larger ones that were mounted on wheels and could be transported to places of public gatherings, like fairs, etc. An illustration scanned from an old Cretors catalog, above, shows a typical wheel mounted unit. These vending units were equipped with small steam engines that naturally drew attention of passers by, but they also powered the peanut roasters and pop corn poppers. Over the years these engines have become very desirable collector items, and popular projects for model makers.

During the early part of January I was able to do a little trading for a copy of a set of drawings, and about 3 weeks later had my own half size Creators model.

I decided to go half size and machine most of the parts from solid material rather than purchase a casting kit, which are rather costly. For a size reference the fly wheel is 4".

I did need to make patterns and pour castings for the base plate, crankshaft support bearings, and fly wheel. Shown above during the pattern making process.

Here are the gears for the governor. Tiny little things. They were machined out of a sprue left over from casting the fly wheel.

And finally shown below is a video showing it doing it's thing---amusing people. It is classical engine, but simple and straight forward as steam engines go. Not difficult at all to build.

Thursday, February 2, 2012

Deck Gun

My little 7" x 10" mini lathe was starting to get despondent from lack of not enough use, so in order to cheer it up I machined a ships cannon on it. Kind of small, but that is OK because it does not take up much display space. The tie rods and eye bolts are all size #o-80, which for me requires a 10 power magnifying glass to examine the threads. They were just fine.
Actually I use that little lathe quite often. There are some things it does very well. Holding and threading that size fasteners is one of them.

Thursday, January 26, 2012

Double Head Bolt

I made a double headed bolt as seen above, and I think I got it right. The nut fits well and turns freely along the threads. The problem that I have encountered is that I cannot figure how to get the bolt in a hole. Got any ideas????

Friday, January 6, 2012

FIRST MODEL OF 2012

The first model of 2012 was completed yesterday, Jan 5th. That is not quite January first, but is might still qualify as a New Year Baby. The plans were authored by Henry Frostick and published in the December 1961 issue of Popular Science Magazine. It is not a scale model of any particular prototype. The above shows it while under construction. In contrast to many of my recent models, this one was constructed mostly of steel and stainless steel. Brass was used only for the moving or wearing parts. The pattern on the block is called "engine turning" or "jeweling". It is done by pressing a spinning rubber bonded abrasive against the metal over an over again, indexing the part slightly each time.

It has already been given a spot on one of the shelves in the display room, and it seems to fit in very comfortable, just like it belongs there.

Like most open steam engines it has some interesting motion. Take a look at this short video