
Shown below are a couple images showing the new model next to the old original Weeden engine.


Max got his Weeden up to steam next to Birk's Mini Weed. They look great together.


 In 1856 the Swedish steam ship named the Eric Nordevall sank and laid on the bottom of a lake until the 1980's when divers found it. A replica, the Eric Nordevall II has been constructed, and there is a lot of information, videos, etc, about it on the Internet if you care to look it up. The ship was a side paddle wheel design powered by two engines. This model engine designed by Mogens Kilde is not a scale model of the originals, but was inspired by the original, and has a number of similarities to the original. A construction article was published in The Home Shop Machinist in 2008. It was fun to build, and is a most interesting little machine to look at and watch in operation. Much to my surprise it took off running the first time air was applied without any adjustments or anything.
 About a hundred years ago Cretors Co. in Chicago built a line of vending stations from small stationary ones that might be placed in buildings, to larger ones that were mounted on wheels and could be transported to places of public gatherings, like fairs, etc. An illustration scanned from an old Cretors catalog, above, shows a typical wheel mounted unit. These vending units were equipped with small steam engines that naturally drew attention of passers by, but they also powered the peanut roasters and pop corn poppers. Over the years these engines have become very desirable collector items, and popular projects for model makers.
 During the early part of January I was able to do a little trading for a copy of a set of drawings, and about 3 weeks later had my own half size Creators model.
 I decided to go half size and machine most of the parts from solid material rather than purchase a casting kit, which are rather costly. For a size reference the fly wheel is 4".
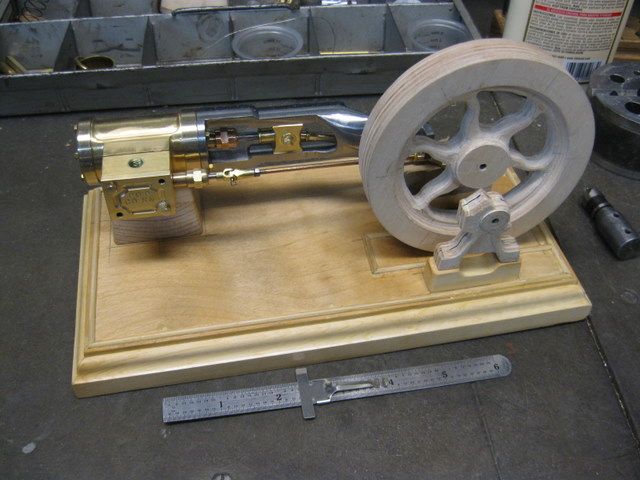 I did need to make patterns and pour castings for the base plate, crankshaft support bearings, and fly wheel. Shown above during the pattern making process.
 Here are the gears for the governor. Tiny little things. They were machined out of a sprue left over from casting the fly wheel.
 My little 7" x 10" mini lathe was starting to get despondent from lack of not enough use, so in order to cheer it up I machined a ships cannon on it. Kind of small, but that is OK because it does not take up much display space. The tie rods and eye bolts are all size #o-80, which for me requires a 10 power magnifying glass to examine the threads. They were just fine.
 I made a double headed bolt as seen above, and I think I got it right. The nut fits well and turns freely along the threads. The problem that I have encountered is that I cannot figure how to get the bolt in a hole. Got any ideas????
 The first model of 2012 was completed yesterday, Jan 5th. That is not quite January first, but is might still qualify as a New Year Baby. The plans were authored by Henry Frostick and published in the December 1961 issue of Popular Science Magazine. It is not a scale model of any particular prototype. The above shows it while under construction. In contrast to many of my recent models, this one was constructed mostly of steel and stainless steel. Brass was used only for the moving or wearing parts. The pattern on the block is called "engine turning" or "jeweling". It is done by pressing a spinning rubber bonded abrasive against the metal over an over again, indexing the part slightly each time.
 It has already been given a spot on one of the shelves in the display room, and it seems to fit in very comfortable, just like it belongs there.
 Yesterday, December 22, a 1/10th scale model of my father in law's cord wood, or firewood saw was completed. This was a rather simple model that was under construction a day or two less than a week.
 In order to make the blade a blank disc of about 20 gauge sheet metal was clamped between a couple supporting discs and 80 teeth milled in with a "V" shaped cutter bit as shown above.
 Yesterday, December 11 2011 a new baby engine came to life at our house, and started chugging away. The engine was built from plans published in Popular Science Magazine in 1947, the year that I turned 14, but of course I did not have skills or equipment to build engines at that time.
 The author of the plans was CW Woodson who was a prolific contributor of machinist articles back in the forties. He was an artiest by trade, machining was his hobby. Apparently iron castings were available for the engine at the time of the printing, but certainly not now. So I made wood patterns and poured castings in brass. This model was under construction for 5 weeks.
 October 30 2011 marked the completion of a model cement mixer. It was pleasant change after building several model engines. The inspiration to build it came from a plan that Rudi Kouhoupt had published some years ago. Although this model resembles Rudy's mixer. I did not follow his plan, and this one is about 25% smaller, and several construction details changed. This model ended up about 6 1/2" high as can be seen in the picture below.
 Friend Mike Nay suggested that the mixer needed a companion wheel borrow to go along with it. About 4 days later it had that companion. With no prototype to copy it was built from memory, of ones seen in the distant past.
 As a point of interest the ring gear was machined from brass plate and then parted off.
 The bowl was machined from a solid piece of aluminum. All of the flat sheet metal parts for the mixer and also the wheel borrow were cut and formed from the sheet metal off an old washing machine .
 After being under construction for over two months a model of James Watt's first engine has just been completed. This is not an exact scale model of that first engine built in 1788, but rather a representation that displays some of the features, like the sun and planet cranking gears that were used to avoid patent infringement. The original prototype had many firsts. Like it was the first engine to use steam under pressure to move the piston. It was the first steam engine to produce rotary power. It was the first engine to be rated in "Horse Power". The first to have the speed controlled by a fly ball governor. It was actually the beginning of the industrial revolution. James watt and Matthew Boulton formed a partnership, and after building this first engine, built hundreds more that were used in the British Isles and Europe. This first engine, by the way powered polishing machinery in Mathew Boulton's factory for 70 years. That is a long time for something of that vintage. The engine is now preserved in the Science Museum in London. Look it up on the Internet, there is lots of history about it.
 Shown below are a couple short videos, one showing a close up of that governor that actually controls the speed of the model, and the other more of a look around as it is running.
 After building several model engines this year I figured it was time to work in another metal sculpture. The inspiration for this one came from one of several pictures that Guy sent me from Disney Land while he and his family were vacationing there. (Shown below) While there are some similarities it is not a copy. The bells and Friar heads were cast from bronze. Some of the small decorative pieces from aluminum, and the rest is made of steel
 Gardening hint of the month: Growth Stimulants
 It looked like someone had been smashed by an old cast iron bath tub.
 I searched for a manikin, but when I found how costly they were, I decided t cobble something together myself. It is built out of the bottom pan of an old swamp cooler.