Monday, November 30, 2015

Sadly Birk Petersen Passed away Wednesday, November 25, 2015 Birk loved building steam engines, small scale models, and whimsical creations of his own imagination. He loved showing his amazing collection to visitors. Some of Birk's favorite visitors were kids, he enjoyed watching their enthusiasm as they turned cranks, got their hair to stand on end, and dumped out a whole scoop of candy from the steam shovel.He also loved sharing his creations with his blogging community and friends on the internet from all over the world. This blog only showcases a fraction on the many wonderful creations the Birk has built over the years. He was and inspiration to us all. Please take time to browse through this blog. Nothing would make him happier than having others enjoy his work. Feel free to leave comments and memories below.

Sunday, November 15, 2015

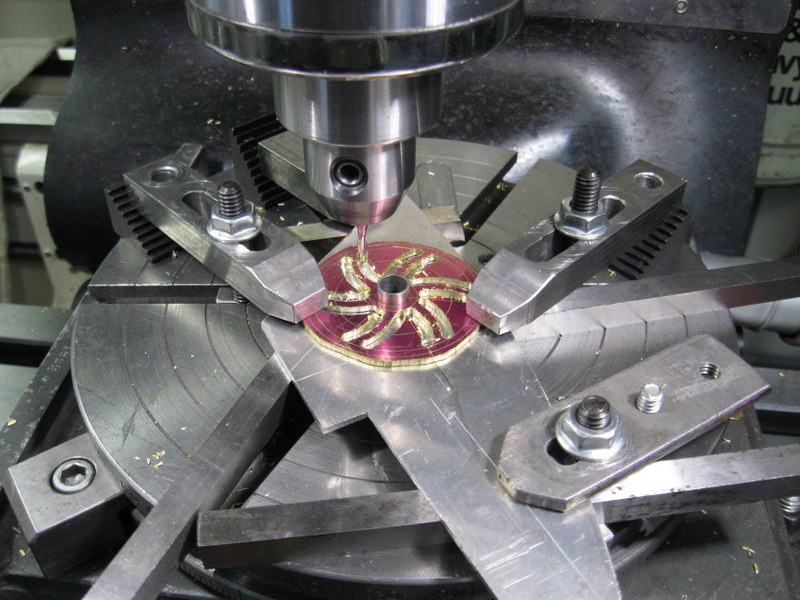
IMMORTALIZED GRASSHOPPER

    I was out there raking up some leaves when I spotted a poor old grasshopper. He was cold and sluggish, probably very near the end of his life span (after all it is November) so it was not  much problem to catch him, but he kept wanting to wiggle and squirm around, even tried to kick me so I had to fumigate him. Then he kind of went flop like a dead grasshopper. I had a heck of a time to get him to sit up and look natural. I heated a stick of sprue wax and stuck to his head then placed him on a piece of wax paper and tried to work some casting investment plaster all around him. He was not quite in a natural position, but as close as I could get him. After the primer coat of investment had set up it was placed in a flask and filled full of more investment plaster. Then a 5 hour session through the burnout furnace where the temperature was gradually increased up to nearly 1400 degrees F., which volatilized organic material, and then reduced back to 900 degrees in the last hour prior to casting. The casting turned out good with excellent detail except for the antenna which were about as thick as a hair broke off.
    That grasshopper has now been immortalized forever in bronze.
    Can you imagine an 82 year old man messing around with something as silly as casting a grasshopper in bronze?


Note:
The two pictures showing the heating arrangement and pouring were simulated to give you and idea of the process. Working alone I could not photograph that part in action.

Friday, October 30, 2015

GENERATING STATION

A model generating station has just been completed. It is not a scale model, but a simple representation of a very early 1900s vintage generator, shown below.
These were low voltage high current machines. I'm not sure of all the things they were used for, but some powered arc furnaces to refine metals.
The pole pieces for the model were made from 1/2" steel plate machined to shape. Above you see some of the forming taking place on a rotary table mounted on the milling machine.
The commutator was built by turning a copper sleeve and epoxy gluing it on a turned Micarta insulator sleeve , and then sawing a slit between the segments.
Several castings were needed, but I only had to make a pattern for the base. The other patterns were pulled out of my pattern pool.
   If you note the brushes are set up like the original, so they can be rotated around to find the place of greatest efficiency.  The field magnetism is provided by a stack of ceramic magnets clamped between the pole pieces. The armature is wound with regular magnet wire.
   The generator was under construction during most of the month of October, and was finally completed yesterday. Below is a short video of it doing it's thing.


Monday, October 5, 2015

OLDHAM'S COUPLING

Another project has just been completed called Oldham's coupling named after the inventor John Oldham, (1779-1840) an Irish engineer. It is simple and compact, and unlike a universal joint it is constant velocity. Although it was invented about 200 years ago it is still used in many of today's machines in various forms.
My project was constructed by looking at the picture the Z5 thing shown above. Which was probably a classroom demonstrator.
Below is a short video of it in operation. In the video the shafts are offset slightly over 1/2". As you can see it works very free and easy. It is just so much fun to turn cranks.


Thursday, October 1, 2015

RECTILINEAR


While searching the web looking for things of interest and ran onto this gadget, which is a demonstrator of James Booth's 1843 invention of a "rectilinear" linkage or mechanical motion that was intended to be used on  a compact steam engine. Apparently there are no records that such an engine was ever built. However more recently English model builder Anthony Mount ran onto the patent drawings and designed a scale model. It is the model shown to the right on the cover of his book shown below.
This project started by making a wood pattern and pouring castings. While I was at it, I also poured castings for the next intended project.
This was a simple project with few parts, but still took several days. Yesterday it became operational, and this morning it received a little paint and a wood base. Although it is interesting to watch the movement, I do not know how practical it would be in a steam engine. I'm sure my model will end up being another desk toy.


Monday, September 21, 2015

QUADRA-HEXA THING

Another workshop project has just been completed. I do not even know what it is called or what it would be used for, but for a lack of a better name I'll call it a Quadra-Hexa Thing because it has a four arm rotor on one end and six arm rotor on the other. Inspiration to build it came from looking at pictures of mechanical mechanisms. This thing uses ideas from two similar mechanisms incorporated into one.
Construction started by sawing a couple chunks out of 3/4" thick aluminum plate for the larger rotors.
Then to the rotary table on the milling machine to finish the arms.
The small rotors were milled out of solid 416 stainless steel bar. They are not very big, but time intensive because so many different surfaces requiring different setups.
The bearing standards were fabricated out of steel brazed together.
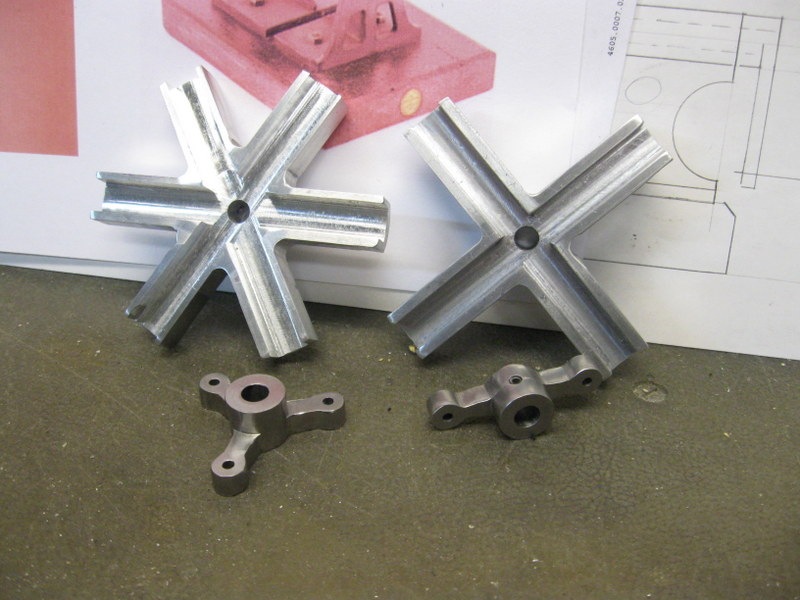
A coat of paint and a walnut base and it was finished as seen in the first picture.
It will rotate in either direction, and by turning the crank at either end. I was surprised how smooth it operates.
If nothing else I suppose it would make a good desk toy. It is fascinating to turn the cranks and watch the action.


Tuesday, September 8, 2015

WATER RAM

For something completely different this time I picked a water ram. They use the energy of running water to pump a portion of it to a higher location where it is needed. Although they are seldom seen, they are still in use in remote areas. This one of course is just a tiny working model standing only about 5" high.
It started by finding a suitable looking picture. It is a little difficult to read, but the lettering on the prototype reads "The Gould Mfg Co". Two patterns and a core box were required, as can be seen in the above picture.
This picture shows the sand mold with the core in place prior to putting the cope in place to pour the castings. After pouring the casting the sand core is removed leaving the pressure dome hollow.
Here the molten aluminum is being poured into the mold. Extra castings were poured in case there was a defect I would not have to do it over again. They all turned out OK.
With castings in hand the machining started. A few parts or operations each day until it was complete. Then came the testing to see if it would work. At first it would not, but after a couple minor changes and adjustments it took of doing what water rams do, Pump Water. Take a look!
The water supply for this model simply comes from a plastic bucket. A prototype would be placed near a stream.


Sunday, August 23, 2015

HOOKED

Yesterday I Hooked fish on the pole that sticks out on the front of the little barn. It started out as a welded framework of heavy galvanized wire, and I had to sacrifice a pair of my denim jeans to make the skin out of. The purpose: to create a smile on passers by. It is 40 inches long.
There have already been a couple of the commercially made, fish shape decorative wind sock things made out of Taffeta on the pole. Taffeta does not hold up when exposed to the elements. Hopefully the denim will.


Wednesday, August 12, 2015

ROCKING ENGINE

Another little replica engine of the electrical driven type. I had actually been inspired to build this one some time ago when I seen a picture on the Internet, and I did make the flywheel at that time, however it was put on hold while I built a couple ball roller machines.

The flywheel was made from 3 pieces of scrap brass machined and then soldered together. Machining the curved spokes was an interesting rotary table exercise as can be seen above.
It turned out quite nice, but as I said, was set aside while I built a couple other projects.
When I got back to it work proceeded a couple parts or operations per day. It was built by looking at a picture, only changed around so that it is not a copy, although it operates on the same principal. The base was milled out of a piece of hard Maple. Construction time, a couple days under two weeks which is pretty quick for me.
     Below is a short video so you can see it running.


Sunday, August 2, 2015

RUNNERS ON THE ROAD

The workshop is always in need of another project and there were a lot of ball bearings in stock so how about another silly ball roller operated by a crank.
Started out by machining the device that returns the balls back to the top of the track. I've built these before and each one is different depending on the application, but they work similar. I also made a mock up of the flip flop device that will direct the balls alternately down the two track groves.
Next I built the frame and track. The track was milled out of hard maple.
Once I was satisfied with the operation of the balls rolling down the track I moved on to making the runners. They too were made from hard maple. Starting with a simple sketch that I had drawn for a pattern, body parts were blocked out with the scroll saw, and then shaped with a Dremel tool. Hip and knee joints were milled with the milling machine.
Painting of the runner figures was with tole paints, and they were assembled with heavy duty dressmakers pins.

     Finally after being at it for about 3 weeks the runners were ready to go for a run. Right lively bunch. Take a look for yourself.


Thursday, July 9, 2015

EGG DROP SOUP MACHINE

After building several electromagnetic motor models it was time for something whimsical. So how about an Egg Drop Soup Machine to idle away some otherwise empty hours.
I had spent time on the Internet looking at marble rollers trying to get ideas and I finally settled on birds passing the marbles or ball bearings in my case. I seen one of fish passing the marbles so birds would not be an exact copy, and then I also incorporated a hand cranked pump to return the balls back up to the top.The design started by drawing a bird and making copies and placing them on a paper to work out the kinetics as seen in the picture. That is also about the time I came up with the name.
Castings would be needed so patterns for the birds were carved, and the others could be reused from previous projects.
A day of foundry work and the castings were poured. Aluminum material for melting came courtesy of neighbor Howard Gerstner's old shower stall. I had made steel cores, that also functioned as heat sinks, seen to the right. They formed the mouth and also the slot for the neck.
The "pump" was a fairly simple thing of my own design that pushes the balls up a tube.
After everything was built and put together it was taken apart and painted. Here is a picture part way through the painting process.
    Finally after some very frustrating hours of adjusting it is working as it was intended during the concept stages. Some of these simple things can be as difficult as real machines to get operational.


Wednesday, June 3, 2015

FROMENT ELECTRIC MOTOR

While looking at pictures of old electric motors, there was a picture of the first motor built by Paul Gustave Froment in 1845. The design looked as though it would make an interesting model.
The flywheel was the first part. I wanted an excuse to try the new rotary table that I had received for the mini mill just a few days prior. It worked great, the table is now justified.
A image was down loaded from the Internet of a reproduction that someone had built. It was almost identical to the image of the original motor, except much clearer. The image was re sized so the the flywheel measured 2 1/2" diameter, same as the one I had machined. From there everything could be made in proportion without the need of making a drawing.
       Yesterday the final parts were completed and assembled, and of course it needed to be tested with power. Connected to a 6 volt battery it ticks over at a nice leisurely pace. Take a look at the video.